RSB Sour Cream Coffee Cake–Modified
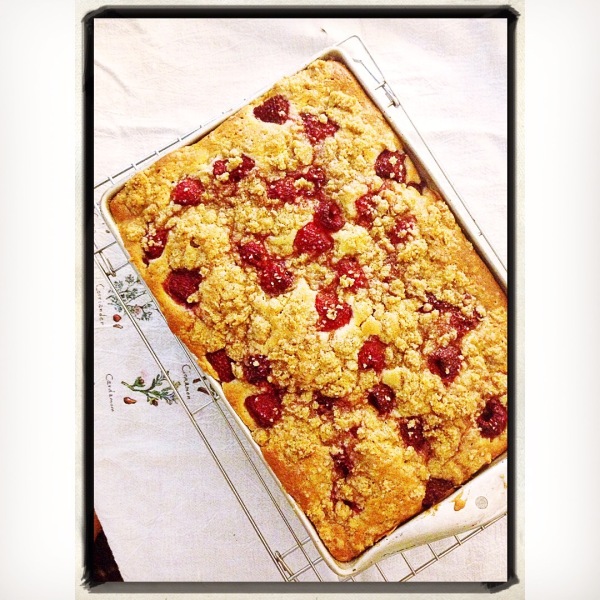 Made this the other day with a couple of updates and felt like I should post it again! Since Abe mostly eats what we eat I’m experimenting with cutting some sugar and subbing some whole grains in to my baked goods–not all of them, and not all the time. I think cookies should sometimes just be cookies. But often I’ve found that they’re really just as good, if not sometimes better, with a little less sugar! This was one of those times.
NB: Abe didn’t have any of this. We’re not there yet, I’m trying to spare him a sugar addiction for a song as possible. But if I can keep cutting it down to a point I’m comfortable with, maybe soon. Plus, there wasn’t really any left for him. So, there’s that.
For the batter:
1.5 sticks butter (softened)
3/4 cup sugar (originally 1 cup. this was just the first time doing this with this recipe and I didn’t want to go too crazy. next time I’ll cut a bit more and see how it does and update)
2 eggs
2/3 cup sour cream
1 1/2 teaspoon vanilla
1/2 teaspoon baking powder
1/2 teaspoon baking soda
1/4 teaspoon salt
1 cup all purpose flour
1/2 cup whole wheat flour (changed from all-purpose, again, starting small, but will keep experimenting)
For the topping:
1/3 cup brown sugar
2 tablespoons white sugar
1/2 cup flour
4 tablespoons cold butter (2 oz, half a stick)
1/2 teaspoon cinnamon
And as an add-in: 9 oz fresh raspberries tossed with the zest of one lemon
Method:
For the batter: Cream butter and sugar until light and fluffy, then beat in the eggs until smooth. Add vanilla, baking powder, baking soda, and salt (I tend to add all these right after the eggs, but you could also mix the dry ingredients in with the flour, that’s more standard)
Alternate adding the flour and the sour cream and mix until smooth.
For the topping (in a separate bowl): Mix the dry ingredients together and cut in the butter–you can use a pastry cutter to start the process but inevitably it’ll work better if you just get your hands in there! Keep working the butter into the dry ingredients you’ll eventually get a nice even texture out of it. It should clump when you press it together, but break apart easily.
Final steps:
Spread half the cake batter into the pan, and drop in half the raspberries, scattering them evenly over the top. Add maybe 1/3 of the topping, crumbling it among the raspberries. Repeat with a second layer: batter, then raspberries, then the rest of the topping. Be careful not to crumble your topping too small or it’ll all disappear and you won’t get those nice big coffee cake crumbs!
Bake at 350 degrees in an 8×11 pan which it filled to the brim for about 30-40 minutes until golden brown and a knife came out cleanly. This was DELICIOUS. We really did eat it all in like 2 days–the raspberries bake for long enough to become jammy and it all blends together really nicely.
RSB Sour Cream Coffee Cake
So… We’re back?
It’s been a long time. But this project is far from complete, and I finally have the time and energy to get back to it! I spent the other night writing up a list of recipes that I wanted to work on, and am hoping to spend the next few weeks slowly chipping away at it. There’s a separate list of recipes to re-do–so some of those may pop-up as well!
To start us back up again, here’s the recipe for Rising Sun Bakery sour cream coffee cake!

You’ll need:
For the batter:
1.5 sticks butter (softened)
1 cup sugar
2 eggs (or 4 egg yolks–I used the 2 egg version but written next to it was the suggestion to try double the amount of yolks instead)
2/3 cup sour cream
1 1/2 teaspoon vanilla
1/2 teaspoon baking powder
1/2 teaspoon baking soda
1/4 teaspoon salt
1 1/2 cups flour (technically this came out to 1.6 cups–so I just used a half heaping cup)
For the topping:
1/3 cup brown sugar
2 tablespoons white sugar
1/2 cup flour
4 tablespoons cold butter (2 oz, half a stick)
1/2 teaspoon cinnamon
optional: 3/4-1 cup nuts (walnuts recommended–but I did not include nuts because my husband can’t eat them, which means I didn’t test this quantity. It seems a little high to me. If you try it let me know what you think!)
additional note: because I left out the nuts, I felt like the amount of topping was just a little low… It still tasted delicious, but if you really love the streusel-ey/topping part and are leaving out the nuts I’d maybe make extra!
Method:
For the batter:
Cream butter and sugar until light and fluffy
Beat in the eggs until smooth
Add vanilla, baking powder, baking soda, and salt (I tend to add all these right after the eggs, but you could also mix the dry ingredients in with the flour, that’s more standard)
Alternate adding the flour and the sour cream and mix until smooth.
For the topping (in a separate bowl)
Mix the dry ingredients together and cut in the butter–you can use a pastry cutter to start the process but inevitably it’ll work better if you just get your hands in there! It’ll start out lumpy and weird but if you just keep working the butter into the dry ingredients you’ll eventually get a nice even texture out of it. It should clump when you press it together, but break apart easily)
Final steps:
I baked my cake in an 8×11 pan, which was just about perfect size-wise. I wouldn’t go smaller than that, but would be curious how it would do in a slightly larger pan–it didn’t spill over the top but definitely was a tight fit. You could probably also bake it in a bundt pan! Either way the method for putting it together is the same. Layer half the batter in the bottom of the pan, then add half the topping, then the other half of the batter, then the other half of the topping!
Bake at 350 until golden brown and a knife comes out clean–mine took about 30 minutes. I’ve noted this before, but I have a habit of not setting a timer and just baking things until they smell right. I know most people use a timer of some sort so I promise I’ll work on this habit so I can give you some better time estimates…

This cake was seriously delicious. I’ve always loved baking with sour cream, and this was no exception. It was everything a good coffee cake should be. My husband and I ate half of it right out of the oven. Granted, he had just come back from the gym and I’m pregnant. But still. It was really good. Enjoy!

PS these photos were literally taken with my phone right before the cake disappeared into our stomachs. Next time I’ll try to document it a little better… I’m struggling with the food photography thing. I’d rather make it and eat it than photograph it. Any advice appreciated.
We have an oven again! And Saturday morning muffins.
I know, I know. I always have an excuse for going so long between posting recipes. But this time I have a good one: for over a month this past spring our oven was broken.
Cue the tragic music. Unfortunately the demise of the oven happened immediately after a leak developed in our roof. Our landlord had to deal with the more pressing problem first–and the roof won.
Our oven is now working again, and all is right with the world. For the last couple weeks I’ve been obsessed with making muffins. A good muffin is a wonderful thing, but they can be hard to find–especially if you like muffins that can actually fill you up get your day off to a good start, not just bring on a sugar crash. I’ve been working on my own recipe, and today’s were remarkably successful–so I’m going to post them! These are not a bakery recipe, but they were inspired by the perpetual quest for the RSB Morning Glory Muffin. Quite a few people have requested that particular recipe, and I just can’t find it! I’ll keep trying, but in the meantime here’s a similar version of my own creation that I think is delicious!

LMC’s Saturday Morning Muffins
*Note: I had no idea these were going to be so successful, so there are no photos of the process, just the final result. Also, since I made this recipe based mostly on instinct and a knowledge of basic muffin proportions, the measurements are not super exact. I wrote down approximate measurements so that I could re-create these particular results, but the recipe was also based on the contents of my pantry and fridge (hence the milk/sour cream combo) and I will happily adapt is as needed next time. It’s a flexible recipe. No sour cream? Sub yogurt, or milk. Not enough whole wheat flour? Try subbing some oats, or just use a different proportion of white to wheat. Sometimes you’ll go too far or get too creative and you’ll fail. But eventually you start to know what good muffin batter feels like, and good bread dough, or brownie batter. It is possible, I promise.
Anyway… I started by whisking together the following dry ingredients:
1 1/4 c whole wheat flour
3/4 c all purpose flour
2 T flax meal
1/3 c white sugar
1/3 c brown sugar
2 t baking powder
1 t baking soda
1 t salt
a sprinkle of cinnamon, and a sprinkle of cardamom (less than a pinch)
Mix in:
2 small grated carrots
2 small grated apples (these were pretty small. and peeled/cored before grating)
1 tablespoon orange zest
Any other add-ins you’d like, for this batch I used about 1/4 cup of chopped dates, and 1/2 c blueberries. I meant to also add nuts, but I forgot!
Blend this all together, then add the wet ingredients:
2 eggs
1/3 c milk
2 T sour cream
1/2 c vegetable oil
Mix as little as possible to bring everything together, and if possible let the batter rest for a few minutes before scooping into a well-greased muffin tin (or, even better, use the little muffin papers). I filled mine about 3/4 of the way full–pretty standard for muffins–and they came out with a nice peaked top. As I post this I’m realizing you can’t really see that in the photos–but they really did! And a good muffin top is key in my book…
To bake, heat your oven to 500 degrees, then lower it to 400 as soon as you put the muffins in. Bake until the tops start to brown and a toothpick comes out clean. I baked two sizes of muffins, and they took about 10 minutes and 20 minutes to bake respectively–so the time will totally depend on the size of your muffin tin…

Voila!
I actually liked these a little better than the morning glory muffin recipes I had been trying out–they are lighter and fluffier, and not quite so cake-like. Don’t get me wrong, I LOVE a good carrot cake, but I want something a little less dense in a muffin. These hit the spot!
I really would encourage you to try this recipe out, and mess around with the ingredients as you see fit. I’m almost wishing I had added more–I had some blackberries in the fridge and walnuts and pecans in the pantry! Maybe next week…

RSB Peanut Butter Cookies
The promised second post!
This recipe for peanut butter cookies is far from the most unique or complicated recipe taken from my old rising sun bakery notebook, but it’s definitely delicious. It would have been an easy recipe to tackle in the early days of this blog, as it was fairly simple to shrink down. But the truth is, until recently I just wasn’t sure I liked peanut butter cookies.
As a kid, they were not my favorite. Even as a young adult, still not my favorite. They were just, boring! But either these cookies are just really good, or my tastebuds have changed (or both, probably both), because they are now make a regular appearance around here (encouraged by my peanut-butter loving husband).

This will be a quick one, ready?
Ingredients:
1 stick butter
1/2 c white sugar
1/2 c brown sugar
1/2 t vanilla
1 egg
1.5 c flour
1/2 t baking soda
1/2 t salt
1 c peanut butter
Method:
Cream peanut butter and butter until smooth, then add sugars and cream until fluffy.

Add vanilla, salt, and baking soda, cream again for a few seconds, then beat in the egg.

Last step: add flour and mix until the dough comes together.

I made this dough early in the day, so I refrigerated it for a couple hours until I was ready to use it. But it tends to get crumbly as it sits, so you may want to bake it sooner rather than later, or let it soften up before you scoop it. And after scooping, be sure to mark it with the traditional peanut butter cookie scoring on top (a hashtag of sorts with a fork).

*If you find that the dough is too crumbly for your tastes, absolutely feel free to add a tablespoon or so of milk, just enough to soften it up and bring it back together.* It will cause no harm, it may even make it better. Also, this recipe is super easily doubled. But it’ll make a ton of cookies. We usually stick the dough in the fridge and bake off about 4 cookies a day–doubled, this recipe lasted us over a week.
Bake at 350 until the edges are firm. I like mine soft in the middle with a crunchy edge, which usually takes about 12 minutes (for a medium sized cookie). Adjust the time as you see fit! I’ve never baked these long enough to make them completely crunchy, but I suppose it could be done.
Enjoy!

RSB Basic Yellow Cake (with Caramel Frosting)
A new post!
What’s even more miraculous than the fact that I’m finally posting this is the fact that I have a second post almost ready to go as well. You might get two whole posts this weekend! The photography in this one, well, it’s nothing to write home about. And for that I apologize. If I don’t get this done during the day, I’m stuck with terrible light at night. And sometimes, I feel like it’s better to just post the recipe, get any feedback, and try again with the photography later! I’m pretty sure I will be making this cake again..
So yellow cake. I was alarmed when I first started to adjust this recipe because at first glance I thought it was going to call for 7-8 eggs, which seemed like a lot. So I changed my proportions and ended up using 5 eggs, which, while still a lot, seemed a little more plausible. And I think you might be able to get away with 4. If you try it, let me know? It was exactly enough batter for the two layer cake that you’ll see in the photos–and lasted the two of us 4-5 days (of eating a lot of cake). Next time, I’ll make it for more than two people… Oops.

Here’s what you’ll need:
1 and 1/3 sticks butter (5.3 oz, or about 11 Tablespoons)
1 1/2 cups sugar
4 or 5 eggs
2 heaping cups flour (you’re going for 2.11 cups here…)
1/2 cup cornstarch (not usually a thing I have in my pantry or use, but there it is. it adds some structure and approximates the effect of cake flour. I think.)
2/3 t salt
1 T baking powder
2/3 cup milk
1/4 teaspoon each of vanilla and almond extract (or you could probably just pick one and double it)
In making this cake, you’ll follow your basic cake/cookie method… Cream the butter and sugar until light and fluffy, add the baking powder/salt, and then beat in the eggs. I mixed the flour and cornstarch together (dry), and then alternated it with the milk/almond/vanilla (wet) so that it went dry, wet, dry, wet, dry.
This may be weird, but I found this cake batter particularly beautiful:

Bake at 350 until a toothpick/knife reveals that the center is done. It’ll be golden brown on top. Took mine maybe 30-40 minutes–but this will vary a lot on the thickness of your layers! Honestly, I rarely time cakes. I just start checking after about 25 minutes, and rely a lot on color, smell, and the toothpick!
I think this cake would be great with just about any frosting, but I used the RSB caramel icing recipe that I’d also been wanting to try, so here’s that it you’re curious. It is in definite need of experimentation and refinement, so forgive the lack of clear directions, I’m working on it!
You’ll need three things: 3 cups of brown sugar, 3/4 cup milk, and 3/4 cup half and half.
Full disclosure here, I had no half and half, just whole milk, so I just used that. I also made slightly less than this, 1 cup milk and 2 cups brown sugar. So, same 2:1 ratio, but I’m recommending the larger portions because this just wasn’t quite enough frosting for the layer cake!
Method:
Dissolve sugar in the liquid in a medium sized sauce pan–if in doubt go larger rather than smaller. This stuff bubbles up like none other. Cover and cook for about 3 minutes (for lack of better direction, I used medium heat), then uncover and cook without stirring to 238-240 degrees. Clearly, it’s best if you have a candy thermometer–but the internet informs me that at this temperature, it will have reached “soft ball stage.” Candy/fudge maker I am not, but apparently this means that if you let a drop fall into cold water it’ll form a soft, squishy ball, that will smush between your fingers if you take it out. Google it if you don’t have a candy thermometer and/or are curious.
Anyway… Once it reaches the correct temperature/stage add 1/2 stick butter and remove from the heat. Let cool to 110 degrees–which should take a few minutes, there should be a skin forming on top–and add 1/2 t vanilla. Then beat (a mixer is handy here) until thick and creamy! Don’t leave it alone for too long, once it starts to thicken it goes fast!
Once your cake is cool, frost away! An offset spatula is handy here. I don’t have one of those in our new apartment. Need to get on that.

I have this problem with waiting long enough to take cakes out of the pan. Don’t be like me. Let them cool! And butter/flour your pans well or use a parchment circle if you want to really get them out easily. Here it is almost done:

If you want to get rid of crumb messiness and make your cake look super smooth, it often helps to put on one thin layer of frosting, let it chill a bit, and then re-frost over the whole thing. But that takes patience. And this cake wasn’t going anywhere fancy, so we just wanted to eat it as soon as possible.

I think it still looked pretty good! And it tasted even better. Enjoy!
RSB Cream Scones
Happy Sunday!
This recipe made a perfect late breakfast/brunch for me today–and came out incredibly well for a first test-run!
I didn’t take a ton of photos–mostly because it really was just a first test-run–but next time I will give you a few more. I’ve reached the point with this blog where I’m finding that my first attempts at food photography were, well, not so hot. And I’m going to have to re-shoot a bunch of recipes if I do ever want to make a cookbook! So I’m doing a lot more experimentation with depth of field, background, pottery, natural light, etc… I’m not sure food photography will ever be my “thing” (if you want to see my real photography, check out my other blog: lmcphoto.wordpress.com and/or my website: lmcphoto.smugmug.com)–but I bet I can get a little better at it.
But I digress. Cream Scones!

Ingredients:
2 cups flour
1 teaspoon cream of tartar
1/2 teaspoon baking soda
2 tablespoons sugar
1/4 teaspoon salt (you might shrink this to a generous pinch of salt depending on your salt tolerance!)
3 tablespoons cold butter
1 egg
1/4 cup cream
1/4 cup milk
1/2 cup fruit of your choice (or other add-in)
Method:
Making scones is a lot like making biscuits! Something else that I love to do… You mix together the dry ingredients, then cut in the butter. You want COLD butter so that it doesn’t melt in your hands as you mix it in. I usually start by cutting off small chunks with a knife, then shift either to my fingers or a pastry cutter to finish off the job. You have to work fast. When the butter is mixed in it’ll feel sort of like peas or oats–or that’s what I’ve been told. I think you just have to experiment a bit and see how it feels!
At this point I added in the fruit of my choice (cranberries), before throwing in the egg/milk/cream and mixing it all together. Again, as with biscuits, the lighter your touch and the less you have to mix, the better! I found that I needed a couple extra drops of cream to make it really come together, so don’t be afraid to do that. You don’t want the final product to be wet and sticky–but you also don’t want to over mix trying to bring it all together.
Pull your dough together and out of the bowl, and place it on a floured surface. I flattened mine (just by hand, no rolling pin) to about 1/2 to 3/4 of an inch thick, and cut large rounds out of it (which resulted in 8 scones). You could also make triangle scones by patting your dough out into a large round (about 8 inches wide, 1/2 to 3/4 of an inch thick) and cutting it like you would a pie into eighths. Top them off with some coarse (maybe demerara?) sugar if you’d like! Bake at 425 for 20-25 minutes. I like my scones with a little crunch–so I let the sides get a little dark.

I decided what I really wanted was cranberry orange scones–so I added the 1/2 cup of cranberries the recipe recommended, as well as the zest and juice of one medium-sized orange. This was pure experimentation, so feel free to try your own variations! I plan to.
These were SO good. Light and flaky and tender… All the things a scone should be. Enjoy!

Quick last note: you may notice that a few of these ingredients seem like they could be swapped out for others. The cream of tartar/baking soda ratio essentially creates the equivalent of baking powder. And mixing cream and milk is, well, not too different from half and half. If you wanted to experiment with these subs (or had no cream of tartar) I’d be curious to hear how it works out! I’m not entirely sure how much baking powder you’d have to use–but I’d start with about 2 teaspoons, maybe moving up to a tablespoon.
RSB Chocolate Crinkles
Happy Almost Thanksgiving!
In Cleveland, it’d be snowing. But here in Atlanta, today looked like this:

Anyway, back to the point: at long last, I have conquered the recipe for the RSB Chocolate Crinkle cookie.
I’m not sure what took me so long. I just had a really difficult time with this one! Also–I had a perfectly good alternate version that I’d been using for a few years. So, maybe I was a little worried that I’d mess it up somehow… Disappoint myself and the few readers I have who look for such recipes…
In any case, here it is. Just in time for the holidays!
Ingredients:
4 oz unsweetened chocolate
1/2 cup oil (I used canola oil, which is what I had. The recipe mentions soybean oil. I haven’t tried it with butter).
Just under 2 cups granulated sugar (1.94, if you want to be precise)
4 large eggs
1 1/4 teaspoons vanilla
1 1/2 teaspoons baking powder
1/2 teaspoon salt
2 1/4 cup flour
How to:
Melt together the chocolate and oil until smooth.
Add sugar and mix well.

Beat in eggs.
Add vanilla, baking powder, and salt.
Add flour and mix until incorporated.

At this point–if you’d like to add an optional ingredient, such as mini chocolate chips (or the chopped up andes candies I used for this batch…) go ahead and add those. The original recipe does NOT call for any additions. I was just in the mood for peppermint.
Now, this is SUPER important: this dough MUST chill in the fridge, for at least 2-3 hours, overnight is best.

Before baking, roll lightly in powdered sugar, and press lightly onto baking pan (so that you can see finger marks).

Bake at 350 until the edges start to firm up/dry out–these tend to bake a little longer than you think. Closer to 12 minutes than the 8 I usually aim for. But I’d test this out yourself depending on the size of cookie you make…

Enjoy! Oh, and be careful. You get powdered sugar all over yourself with these cookies.

It’s worth it though.
Hello again, world.
I’m back!
I know I’ve promised this before, but I think things are different now. Primarily because I am no longer working/going to grad school/trying to frantically finish my internship hours all at the same time. I am still working, but it is no longer in a bakery. And so, I need a baking outlet.
In the past month or so I’ve made my way through multiple batches of cookies, cornbread, and biscuits. And I’m trying to start working through bakery recipes again as well–most recently, a batch of RSB french bread and an adaptation of harvest bars.
I’d like to give you a better post here about the french bread, but here’s a start. It’s something I’ll need to make at least a few more times before I can really give you better photos/insight!
I used:
One packet of dry yeast, 3/4 c warm water (to proof), 1/3 c. warm milk and 1 Tablespoon sugar. Once the yeast is bubbly and blooming, I added 1 2/3 teaspoons of salt as I mixed in the flour, which came out to about 4 cups–some of which was added during the kneading process.
I worked on the dough for about ten minutes, kneading it and slowly adding what flour hadn’t gotten mixed in originally. I let it rest once in the middle, and considered it done when it was no longer sticking to the board and felt all elastic and smooth.
I let it rise twice–the first time it pretty much tripled in size, and took about 3 hours. Then I deflated the dough (scooped it out and punched it down) and let it rise again. It didn’t take quite as long this time, and it didn’t get quite as big, but I still waited a couple of hours until it was spongy and dome-shaped. Photos could be helpful here in the future!
I shaped it into a batard (again, photos next time), which is kind of a football shape that bakes on it’s own (not in a pan). I let it rise until it had at least doubled, if not tripled. This was longer than I expected, at least an hour and a half, but it was SO worth it.
It didn’t take long to bake (at 450–and I included a pot of boiling water to steam the oven a bit)–less than 20 minutes I’d say. I took it out when the top was golden and the bottom sounded hollow.
It didn’t take us long to cut into it. And it was delicious.

The biggest problem with writing down a bread recipe, as you probably know, is that it all varies depending on TONS of things, including temperature, flour, humidity, etc… the recipe that I used I had divide by 3, so the measurements weren’t really exact! Hopefully I can keep working with this recipe and will let you know as things develop! If you get the chance to experiment with it, go for it! And let me know how it goes!
Anyway.
Last night I made brown-butter/butterscotch harvest bars–an adaptation of this post: https://risingsunbakery.wordpress.com/2010/02/23/harvest-bars/
If you haven’t used brown butter before, well, it’s worth a try… I hadn’t until just recently. But it’s delicious. Here’s a quick photo progression of what my brown butter looked like from start to finish:


Melted butter starts to foam, then bubble, until it’s bright yellow with little white flecks floating around. Eventually it’ll start to really bubble up and as you stir, you’ll see the butter darkening underneath. It’ll start to smell nutty and sweet and, well, delicious.


As you pour it out you’ll see darker bits on the bottom, that I made sure to scrape out and include… I’m sure you can find the science on what this all is somewhere (something about milk solids, etc…) but honestly, that’s not what I’m here for right now.

This is what it looked like from the top.
And, here’s another quick photo progression of the harvest bars!


I have such love for butterscotch chips. And I don’t care a tiny bit that they’re not “real.”

Delicious. Though next time I’ll probably underbake them a little…

Summer, Lemon Poundcake, and a return to the blog?
I’m back!
Hopefully this post will get me back on a roll–it’s summer, school is out, and I have the time and the energy to bake again!
This week I decided to go for something classic, and something very seasonally appropriate… Lemon poundcake!

I found this recipe in my Dad’s box while I was home over break–it’s one of a few that I discovered this time and hadn’t noticed before somehow…
Very simple. Very delicious. The two of us went through it in 2.5 days!
You’ll need:
2 sticks of butter
1.5 c sugar
4 eggs
1/2 t vanilla
the zest of 2 lemons
1.25 c milk
2 c flour
1 t baking powder
1/2 t salt
Cream the butter and sugar until fluffy, then add the vanilla, eggs, and lemon zest.
Add the milk alternately with the dry ingredients (flour, salt, baking powder) and mix just until incorporated.
Bake at 350/375 until golden brown. I baked mine in a bundt pan and it took roughly 30-40 minutes. I honestly don’t time things very often, I just wait until they look and smell right, and then test the inside to see if a knife comes out clean!
Since working at the bakery I’ve also given up on trying to keep my oven strictly at 350, where it hates to say. We bake EVERYTHING at least at 400, and I’ve found that a little extra heat generally doesn’t hurt.
Anyway. It looked like this when I eased it out of the pan (which I greased and floured liberally):

I felt the need to add a glaze, so I took the lemon juice from the 2 lemons and added a couple cups of powdered sugar–you’re going for texture here, so there’s not necessarily a perfect ratio to follow. This was maybe 4-5 Tablespoons of lemon juice? And about 2 cups of powdered sugar.

As you can see, it was a bit much. I may have flooded the poor cake.
But it was darn good. We ate this much of it the first night:

It was delicate and lemony and perfect. Make it, eat it, love it!
Here’s to summer!
Linzer Cookies for Christmas
I spent last night and this morning putting together a bunch of linzer cookies for a cookie swap at work.
It’s been a while since I made this recipe, and I tried to make them extra beautiful this time because they were all, y’know, going to professional bakers…
I think a few qualified as “unique” but for the most part I really think they came out well!
I baked a batch and a half (from the recipe as translated before here: https://risingsunbakery.wordpress.com/2010/07/09/rsb-linzertorte/) and let them cool/wait over night.

I learned a lot growing up in a bakery. But if there’s one thing I’ve learned from working in a bakery as an adult? It’s that it never hurts to allot extra time to put together things like this… Baked goods can be just as good if you keep them correctly and just put them together slowly!
Halfway through with the raspberry jam:

And finished!

Then I powdered sugared the top pieces before attaching them!

Although they were all cut from the same cookie cutters, varying temperatures of dough/oven etc… led to a few subtle differences in cookie sizes/shapes… So putting them together was a bit of a puzzle in a few cases!


Beautiful no? I have tons of cookie cutters, but the hearts were the only ones that matched up well enough to make this kind of window in the middle cookie with…

I’m hoping to use the next week to make more cookies/use more of my cookie cutters… The Santa/Sleigh/Reindeer ones are perhaps my favorite…
But I’m pretty pleased with how these turned out! Even if I went a little nuts with the depth of field when I was taking pictures. I liked the way the out of focus cookies looked!
I packed them up in plastic wrap/tissue paper. Because the plastic wrap did not seem festive enough.


This batch and a half barely made enough for me to package up 5 for everybody, so I only have a few mismatched/broken pieces to eat myself… Probably for the best!
Hope everybody is enjoying this time of cookie baking!


